
 Eric Jorge Seguí Parejo

Or how to become a web analytics ace by playing with your metrics and dimensions
Web analytics for niche sites is a subject that rarely gets covered because of how difficult and complex it is. An analyst’s job is far from easy, and mastering the advanced features of some of the tools available for this work is even harder.
For this reason, and faced with several problems around linking Analytics data with Amazon data that were hard to tackle and had no solution, I decided to research and build a methodology that adds value to the niche site community.
If what you are about to read proves useful and you manage to get something out of it, I am going to ask you for 4 simple things you can do to help. You do not need to do them all, one is fine:
- Share the article or link to me: by sharing the article or linking to me, you are recognising the work and effort I have put in for the community.
- What would you like me to write about?: I do not want to create keyword-driven articles on this blog, I want to create articles that can be genuinely useful. You may be struggling with certain issues and cannot find a solution. If you contact me through the form (even though it is meant for work enquiries), you can suggest articles there or via social media.
- Help other people: use everything you learn in this article to help other people one day, whether by teaching them for free, adding value to a business other than your own without expecting anything in return, donating some of your earnings, etc.
Any of these will help me and is enough.
At the end of the article you will find a resources section with links to the spreadsheets, DataStudio, the slides and the video from the Corona Marketing Festival where I gave the talk.
Introduction
This whole application is still in Beta, and throughout the article I will add notes covering possible problems that could come up or explaining why things are done a certain way.
As I mentioned at the start of the article, this integration has 2 phases.
The first phase is essentially a web analytics setup, where we make some changes to our site so we can carry out complete web analytics, as well as extracting and preparing some Excel files. This phase only needs to be done once and would have to be updated if products change.
The second phase is the pooling of sales data and updating of Google Analytics data. This phase has to be done on a recurring basis. I recommend doing it once or twice a month.
What can we measure?
The whole implementation takes a bit of time, but it will undoubtedly delight any niche site owner who has never been able to get certain metrics and has always wanted them.
Once the initial process is done, updating the data is fairly quick, although the first few times you may run into some problems until you get the data properly adjusted. Once past the initial phase, uploading data is quick.
There are two processes. With the first one you will be able to get data such as:
- Earnings by medium and by traffic channel grouping
- Product impressions
- Product clicks
- Product CTR
- Average product impression position
- Product impression lists
- Product categories
- Product variants
- Products sold through a click on the affiliate product
- Direct and indirect earnings from clicks on affiliate products
This whole system could be tweaked slightly to also include the pages from which users click and leave, in other words the exit pages (which are not the same as landing pages; there is a clear and important difference that I will not go into here).
With the second option, which uses events, you can see clicks on the product linked on your site and tie them to earnings.
Requirements
To apply this system you will need the following:
- Internet Explorer or Edge with the iMacros extension (forgive me for committing such an act of sacrilege, but it was necessary for the greater good)
- Spreadsheet or Excel
- Screaming Frog Spider or another crawler to extract information
- A standard Amazon affiliate account (if you are on Amazon OneLink, you are screwed, you will have to weigh up what you want to sacrifice, sales or data)
- Google Analytics (obviously)
- WordPress with the Woocommerce + Google Tag Manager for WordPress + Search & Replace plugins (Woocommerce is not needed for the events system)
I also recommend learning to handle some of the data in Google Analytics’ enhanced ecommerce section well, as well as Google Tag Manager.
Recommended (compulsory) reading
- Guide to Analytics Enhanced Ecommerce – Eric Jorge Seguí Parejo
- What Google Tag Manager is and how to start using it from scratch – Eric Jorge Seguí Parejo
- Enhanced ecommerce – Analytics (gtag.js)
- Enhanced ecommerce – Analytics (analytics.js)
- Universal Analytics Enhanced Ecommerce Developer Guide – Tag Manager
Now the good part begins.
I hope you have a couple of hours free to go through the whole procedure. If you have never done it before and your site is very large, the initial implementation could take you quite a while (days) if your niche site is too big. If it is not very big, it should take you very little time.
You may also run into certain difficulties, so I recommend reading the article first and getting a good grasp of the procedure before you get started.
As I said before, once the initial process is done and the whole system is ready, updating the data afterwards is much more practical.
Web Analytics Setup – Phase 1
Each phase is broken down into different steps. Some steps will vary depending on your situation, but let’s get to it.
1.- Implementing Enhanced Ecommerce
To track product clicks, impressions and CTR, among other data, you will need to implement enhanced ecommerce.
If you have your Amazon affiliate products with their links inserted in your WordPress site via Woocommerce, you are in luck, because with the Google Tag Manager for WordPress plugin you only need to configure that plugin to get enhanced ecommerce (you can also download the configured container in the resources at the end of the article).
If your system is not set up as I described in the previous paragraph, you will quite likely have to do some programming. There is a guide to implementing enhanced ecommerce in the Compulsory reading section, where I have also left other useful information to help you understand this whole side of Analytics.
I already explained how to install Enhanced Ecommerce on WordPress here https://agenciaseo.eu/comercio-avanzado-google-analytics/#Implementacion_en_WordPress, although you can also find it in the compulsory reading (I said it was compulsory for a reason).
2.- Scraping product links
The next thing you need is to extract all the links pointing to Amazon affiliate products and assign each one a new ID that we will make up.
Getting the niche site’s product URLs
To get product URLs with their names, WordPress database IDs and any other data you might want to send to Google Analytics enhanced ecommerce, I recommend using Product Feed Manager.
This WordPress plugin will quickly extract all the information you need, as long as your niche site is built with Woocommerce.
If your site is not built with Woocommerce, you will have to find a way to download the information from the database or do some scraping. Further down, in the events-based implementation, I explain the scraping part with Screaming Frog Spider.
Creating and replacing the new associate IDs
You now have all the long URLs assigned to a product name and identifier.
This final URL contains your Amazon associate ID, which will look something like queseo-21, and you will find it assigned to the tag variable:
Next, for each product you need to create a different associate ID in the column next to it, like this:
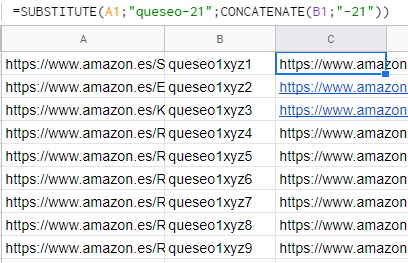
If you look closely, I use the following formula to change each URL to the new Amazon associate ID assigned to it:
=SUBSTITUTE(A1;"queseo-21";CONCATENATE(B1;"-21"))It is important that every URL carries the linkCode parameter with the same value, because this is used later on to detect traffic sources.
Once this step is done, you need to create these new IDs automatically in your Amazon affiliate account.
3.- Automatically creating Amazon associate IDs
Now that you have the new IDs in Excel and assigned to a URL, you need to register all these associate IDs in your Amazon affiliate account.
Doing all this by hand is crazy and simply not feasible, which is why I resorted to creating a macro with the iMacros extension in Internet Explorer. I tried doing it with Chrome and Firefox first, but the iMacros interface for Internet Explorer seems far more advanced.
To use the macro, you need to export all the new values you created to a single-column CSV, like this:
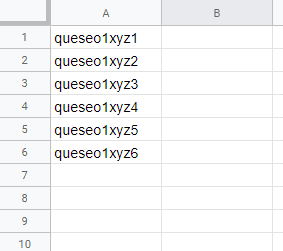
Explanation of the macro code
VERSION BUILD=12.6.505.4567
TAB T=1
TAB CLOSEALLOTHERS
SET !DATASOURCE "C:\\Users\\cloud\\Downloads\\idproductos.csv"
SET !DATASOURCE_COLUMNS 1
SET !DATASOURCE_LINE {{!LOOP}}
WAIT SECONDS=5
TAG POS=1 TYPE=BUTTON ATTR=ID:a-autoid-2-announce
WAIT SECONDS=5
TAG POS=1 TYPE=INPUT:TEXT ATTR=NAME:tag_name CONTENT={{!COL1}}
WAIT SECONDS=5
TAG POS=1 TYPE=BUTTON ATTR=ID:a-autoid-0-announce
WAIT SECONDS=5
TAG POS=1 TYPE=BUTTON ATTR=ID:a-autoid-1-announce
WAIT SECONDS=5
Below I explain what each of the commands means.
TAB T=1 refers to the page open in tab 1. This must be the page where new associate IDs are created (https://afiliados.amazon.es/home/account/tag/manage).
TAB CLOSEALLOTHERS closes all other tabs. I do not think it is necessary, but I was in a rush, so I left it in.
SET !DATASOURCE «C:\Users\cloud\Downloads\idproductos.csv» tells it where the list of values to be passed to the macro automatically is located.
SET !DATASOURCE_COLUMNS 1 indicates that the list has only one column.
SET !DATASOURCE_LINE {{!LOOP}} creates a loop with the CSV values and uses the next value each time.
WAIT SECONDS=5 waits 5 seconds before the next action.
TAG POS=1 TYPE=BUTTON ATTR=ID:a-autoid-2-announce clicks the Create Tracking ID button.
TAG POS=1 TYPE=INPUT:TEXT ATTR=NAME:tag_name CONTENT={{!COL1}} inserts the value from the file into the form using the {{!COL1}} variable.
TAG POS=1 TYPE=BUTTON ATTR=ID:a-autoid-0-announce clicks the Create option.
TAG POS=1 TYPE=BUTTON ATTR=ID:a-autoid-1-announce closes the form.
When running the macro, bear in mind that the free version of iMacros is limited to a loop of 100, so if you have more than 100 products you will need to pay or do this in stages.
The process is relatively quick and you can get on with other tasks while it runs minimised. From what I saw, it creates 100 IDs fairly quickly.
I set the wait time to 5 seconds to allow enough time in case there was an error loading the page and the ID was not generated. At first I had no wait time and it caused problems.
At the moment Amazon’s terms say nothing about this, but I do not know whether there is a limit on generating IDs or whether automating this process could get you banned.
4.- Creating new URLs
To create the new URLs you need to use the Search & Replace WordPress plugin, or find some reasonably quick way of replacing the links in your database.
Before doing this, it is advisable to back up your database, just in case.
With the Search & Replace plugin you only need to enter the URLs like this:
url-original-1,url-nueva-1
url-original-2,url-nueva-2
url-original-3,url-nueva-3
Putting one per line here:
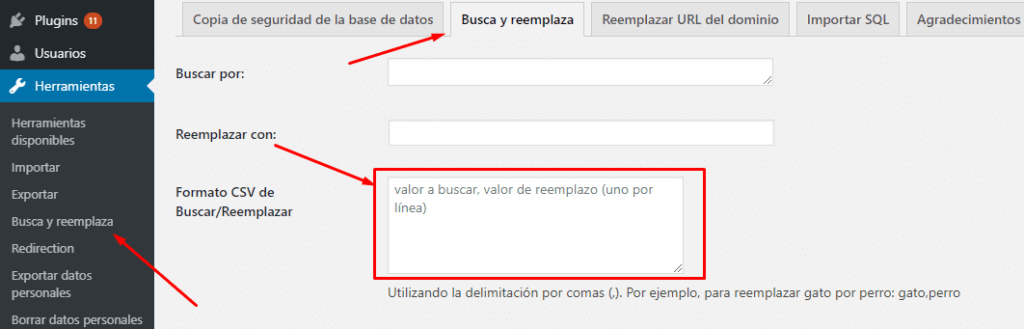
Once you have completed the process, make sure all the links are correct with Screaming Frog Spider.
5.- Detecting the traffic source
All that is left is to work out which traffic source each click comes from and classify it so it can be recognised in both Amazon and Google Analytics.
Linking linkCode to the traffic source
The approach I use with Amazon is to use the LinkCode variable in the long URL. Let’s look at the URL again so you can see and properly understand this parameter:
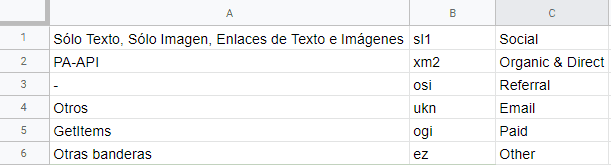
So far I have found that Amazon has up to 6 different types of value for the URL’s linkCode parameter, and each one refers to a different type of ad. These are:
- xm2: PA-API (it seems that from 30 March 2020, if anything is tracked with this you are not credited with the commission, but I did not test it, so this value may be different)
- osi: –
- ukn: Other
- ogi: GetItems
- ez: Other flags
- sl1: Text Only, Image Only, Text and Image Links
- as2: Text Only, Image Only, Text and Image Links
- ur2: Text Only, Image Only, Text and Image Links
- w00: Text Only, Image Only, Text and Image Links
- am2: Text Only, Image Only, Text and Image Links
As you can see, the last 4 values mean the same thing, so we will only be able to use one of them. This is because when you download the reports, it shows which type of ad each sale came from using the descriptive text:
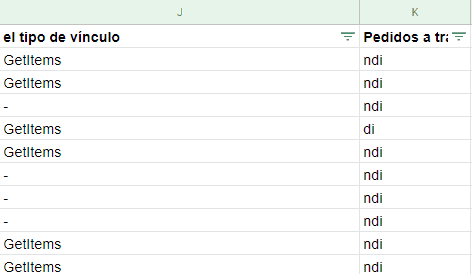
The idea is to use this to link the linked products to traffic sources instead of to the type of linked ad. That way we would still see the same thing, but we would need to map it to a traffic source in a spreadsheet:
Changing the variable dynamically with Google Tag Manager
You can implement this script with Google Tag Manager or directly in the code. I set it to run on every page. What it does is detect the original traffic source and, based on that, dynamically change the Amazon URLs, specifically the linkCode parameter.
It also changes internal URLs by passing a parameter that identifies the last traffic source. That is why it is important for Organic and Direct traffic to stay free of parameters, so that Google does not access URLs with these parameters and make a complete mess of things.
The right way would be to take the source from the cookie instead of using parameters, but I did not have time to prepare all this in a week, and getting this data from the cookie was rather more complex.
It is important that all URLs have the same linkCode (as I already specified earlier in the article), because its value will be used to detect and change the data.
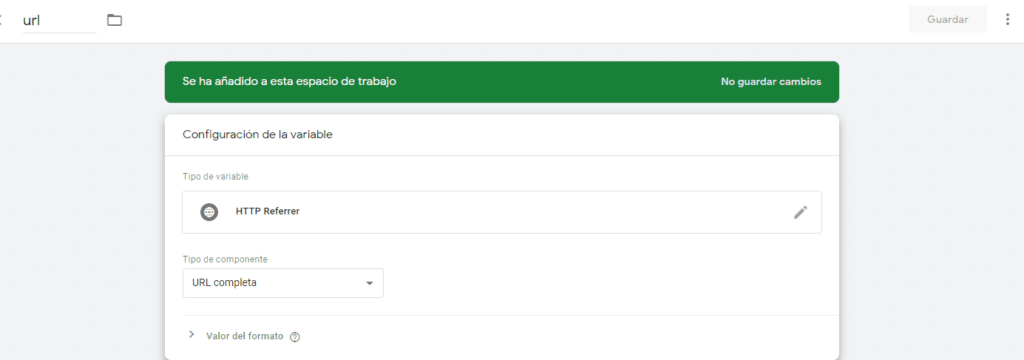
You need to create an HTTP referrer variable in Tag Manager called url:
Here is the sample code (check the comments):
<?php
(function () {

var links = document.querySelectorAll('a[href="amazon.es"]')
var links2 = document.querySelectorAll('a[href="tudominiop.com"]')

var searchString = "xm2" //quí ponemos lo que queremos buscar

//Con la condicional indicamos por qué valor queremos reemplazarlo en función de la fuente de tráfico

if ({{url}}.indexOf("facebook") !== -1){
    var replacementString = "sl1";
    var source = "facebook";
} else if ({{url}}.indexOf("twitter") !== -1){
    var replacementString = "sl1";
    var source = "twitter";
} else if ({{url}}.indexOf("linkedin") !== -1){
    var replacementString = "sl1";
    var source = "linkedin";
} else if ({{url}}.indexOf("google") !== -1){
    var replacementString = "xm2";
    var source = "google";
} else if ({{url}}.indexOf("") !== -1){
    var replacementString = "xm2";
    var source = "";
} else if ({{url}}.indexOf("email") !== -1){
    var replacementString = "ukn";
    var source = "email";
} else if ({{url}}.indexOf("cpc") !== -1){
    var replacementString = "ogi";
    var source = "cpc";
} else {
    var replacementString = "osi";
    var source = "referral";
}

//Con esto reemplazamos la variable por el valor que queremos asignar a linkCode
links.forEach(function(link){

var original = link.getAttribute("href");

var replace = original.replace(searchString,replacementString)

link.setAttribute("href",replace) }

)

//Con esto asignamos una variable a todas las urls internas

links2.forEach(function(link){

var original = link.getAttribute("href");

var replace = original.replace(original,original + '?source=' + source)

link.setAttribute("href",replace) }
)
})();
?>
This would need adapting for every source, and this step could probably be done in a much simpler and better way. Again, the right way would be to do it through the Analytics cookie.
If you know how to do it, I would be grateful if you told me.
With this last step you would have the initial Setup complete and would not need to repeat this whole procedure.
You may well have to make changes manually if you remove or add products.
Updating data in Analytics – Phase 2
This phase has two sections: one focused on preparing data and building URLs, and a second where you need some programming help to run URLs in the background with a loop.
The first section will help you set up the system so that every time you want to update the data, you only have to copy and paste the earnings data from Amazon.
The second section consists of copying the automatically generated URLs to create automatic requests, so that you send the information to Google Analytics when those URLs are run in the background. These URLs will carry the information about the clicked product, the ID and the earnings generated, as well as indicating whether they come from direct or indirect sales (although the latter is fairly optional).
1.- Cross-referencing the data in spreadsheets
The first thing you need to do is download into Excel all the month’s earnings data from Amazon Associates, like this:

As you can see, the first column will not appear in your report. To create it, I used the following formula with the data in the TAG column (I changed the column order; the tag does not actually come out in column 2):
=SUBSTITUTE(B2;"-21";"")This is used to cross-reference our product data with the Amazon IDs we created at the start, without the final marker.
It is important to keep everything you have done throughout the process in a single spreadsheet on different sheets, because we will now start cross-referencing the information as in the image:

In the new sheet I copied the new IDs and the new URLs (the Excel file is in the resources if you want to check it).
In the following columns you need to list everything you will need to send the information to Analytics. In this case, the product IDs and names would still need adding (at the very least).
The formula I use is a conditional with the BUSCARV function:
=IFERROR(VLOOKUP(A2;'Datos Amazon'!A$2:K$2;3;FALSE);"null")It is not included in the example, but it is important that in the link type column shown in the image, you take the value and replace it with the source assigned in Step 5. Basically because you will then use this data to build the URL and send the information to Google Analytics.
2.- Uploading the data to Google Analytics
Once you have all the data you want to send in a spreadsheet, you need to get it all ready and send the information to Google Analytics.
To do this, you use the option of sending information by running URLs: https://developers.google.com/analytics/devguides/collection/protocol/v1/parameters?hl=es#ti
How it works and building the URLs
First, let’s look at how sending information to Google Analytics via URLs works.
You need a mandatory part, shown below, where you have to replace UA-xxxxxxxx-Y with your Google Analytics ID:
https://www.google-analytics.com/collect?v=1&tid=UA-xxxxxxxx-Y
Then you add all the variables you want to send to Google Analytics. In this case, I made a quick example to send a pageview:
https://www.google-analytics.com/collect?v=1&tid=UA-xxxxxxxx-Y&cid=5555&t=pageview&dp=%2FQueseo-Say-Cheese
If you run the URL in your browser, you will see the information in the Google Analytics real-time view as a page called /Queseo-Say-Cheese.
This page is sent with the dp variable and is given the value you can see in the URL after the = sign.
The t variable tells Google Analytics the type of information we are going to send, in this case a pageview, while the cid variable provides the clientId to identify the session with a user (this depends on what you need, but for now I am keeping the same one and making it up so as not to inflate the site’s number of users and sessions).
Once you understand how this works, and using the Google Developers information as a reference, the URLs should look something like this, depending on the information you are going to send:
https://www.google-analytics.com/collect?v=1&tid=UA-xxxxxxxx-Y&cid=5555&t=pageview&dp=%2Fgracias&cu=EUR&ti=OD564&ta=directo&pr1nm=nombre-del-articulo&pr1br=blue&pr1pr=15.47&tr=15.47&pr1qt=4
You may not need some of the variables, such as pr1br or pr1pr, depending on what you need.
You should generate these URLs with formulas in the spreadsheet using the CONCATENAR function.
Running all the URLs in bulk
It is advisable to run all these URLs automatically (unless you are just starting out and only have 3 or 4).
To do this in bulk without it getting in the way, they will be run in the background using CURL_EXEC in PHP, where you need to pass an array with the list of URLs. You could also write a script to build the URLs from the spreadsheet, but I did not do it that way here.
The script in PHP in question:
//Creamos array de urls
$array = array("https://www.google-analytics.com/collect?v=1&tid=UA-49988692-1&cid=5555&t=pageview&dp=%2FQueseo-Say-Cheese",
	"https://www.google-analytics.com/collect?v=1&tid=UA-49988692-1&cid=5555&t=pageview&dp=%2FYeah");

//Ejecutamos el bucle por cada valor del array
foreach ($array as $valor) {

// Crear un nuevo recurso cURL
$ch = curl_init();

// Establecer URL y otras opciones apropiadas
curl_setopt($ch, CURLOPT_URL, $valor);
curl_setopt($ch, CURLOPT_HEADER, 0);

// Capturar la URL y pasarla al navegador
curl_exec($ch);

// Cerrar el recurso cURL y liberar recursos del sistema
curl_close($ch);

//paramos 10 segundos el script
sleep(10);
}
I added a 10-second pause with sleep(10) so as not to fire all the information at Google Analytics in one go and to be able to see everything correctly in real time. I understand it could be removed to make it faster (although I do not know whether it would cause any problem with recognising the data being sent).
The script already has a function that opens and closes the resources. If they were not closed, it could overload our PC.
And with that we would have all our information in Google Analytics. I realise that the methodology is very long and that this whole process can be improved enormously, but bear in mind that until now there was nothing explaining how to do this from scratch.
I hope this article helps people and sheds some light for some users.
Alternative method with events
There is another way of doing all this with events.
The procedure is similar to applying enhanced ecommerce but, as I mentioned at the start of the article, it provides less data.
The first thing you need to do is extract all the URLs (I explain this in the next point) and then follow the steps described above, from the Creating and replacing the new associate IDs point in Phase 1 up to the Cross-referencing the data in spreadsheets point in Phase 2. You do not need to implement enhanced ecommerce, which simplifies the process considerably.
Scraping product links
To extract all the links pointing to Amazon affiliate products and assign each one a new ID that we will make up, we will use Screaming Frog Spider and spreadsheets.
Getting product URLs
To extract all this information, you just need to run Screaming Frog Spider and enter your domain.
One thing to bear in mind is that in this process it is important to extract the long URLs, so if you have short URLs, you will need to check where each of the redirects points (also with Screaming Frog).
To do this with Screaming Frog Spider, switch to List mode, and under Configuration, in Settings, on the Limits tab, change the Limit Crawl Deep option to 1. Paste in the short Amazon URLs and you will get the long URLs with their variables.
Now you can follow the steps described above, from the Creating and replacing the new associate IDs point in Phase 1 up to the Cross-referencing the data in spreadsheets point in Phase 2.
Creating events with Google Tag Manager
To create an event in Google Tag Manager, follow these steps:
- Create a user-defined Google Analytics Settings Variable
- Under built-in Variables select Configure and enable the Click URL option
- Create a Universal Analytics tag.
The tag should end up looking something like this
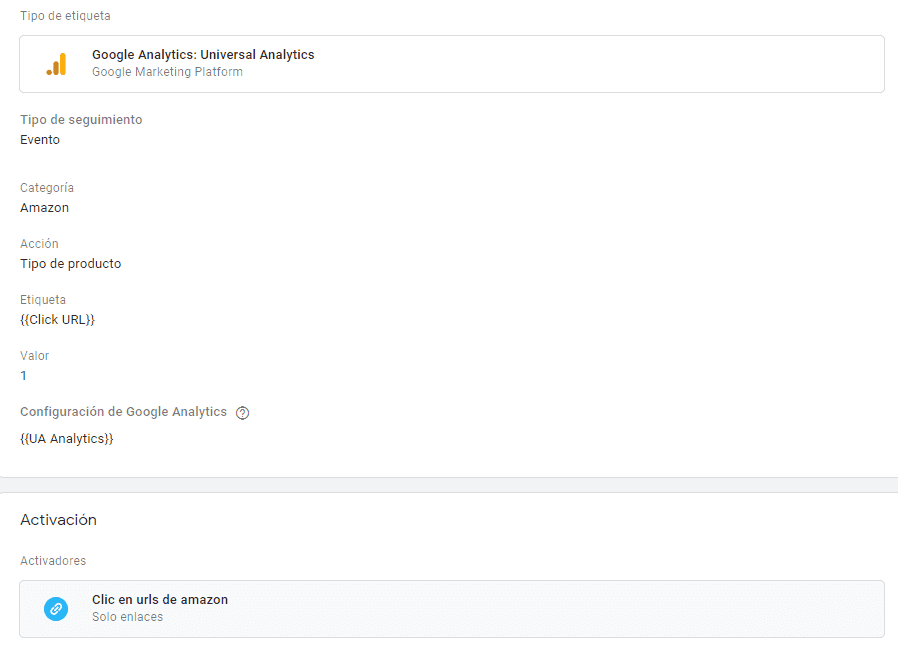
The container in Resources already has this configured. It is important that the clicked URL appears somewhere in the event, because this URL is later used to make the match in DataStudio.
Cross-referencing the data with Google DataStudio
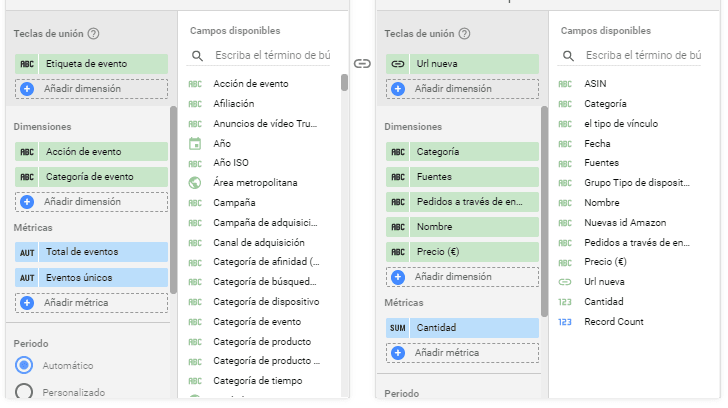
To cross-reference the event data in DataStudio, it is important that the URL clicked by the user appears in some part of the event and is linked to an ID in our spreadsheet, because this is what will be used to connect the event data with the Amazon earnings generated.
To do this, you need to create data sources in DataStudio for both Analytics and our spreadsheet, and then cross-reference the data by the URL I mentioned earlier using the blended data option. It should end up looking something like this:
Finally, when you create the table with the data, filter it by the product click events and you should see results like this:
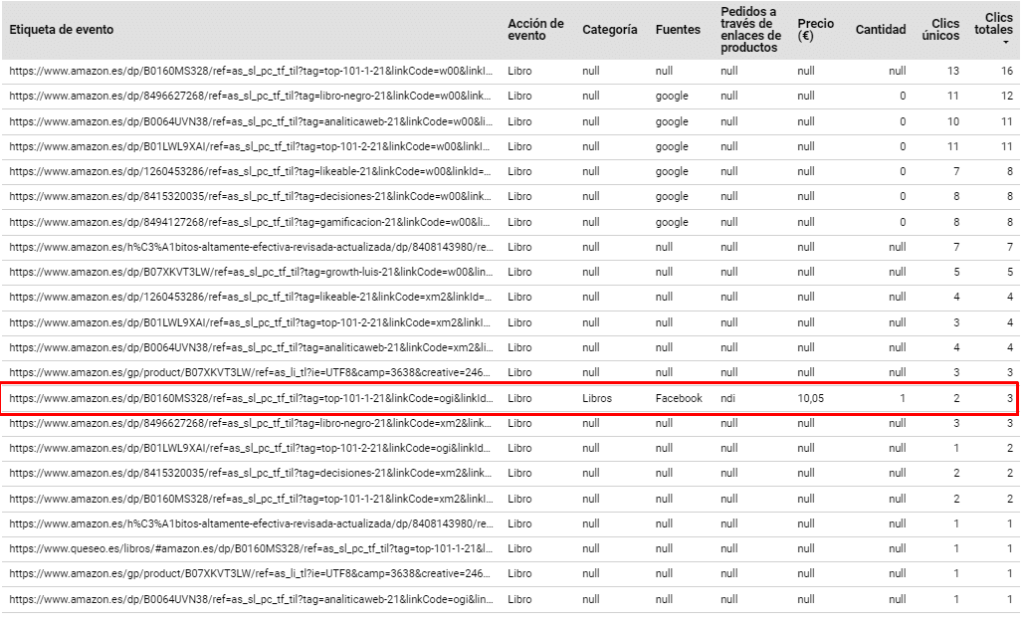
This is the result after several tests. Due to time constraints, there is some invalid data that came up during testing, but the result of this whole process is viable, as you can see.
Although the implementation looks complex, once you get familiar with it, it is simpler than it really seems, though it does take some time to apply.
Resources
https://www.youtube.com/watch?v=rYE3QNQxBtY&t=8613s
View slides How to track a product on your niche site
Conclusions
Implementing all this takes time, it is not easy. As you can see, there are still many things that could be improved, and I am sure much of this process could eventually be automated.
So far I have worked out how to do all this in a week, spending my free evenings and the weekend on it (when I really went at it hard), while preparing the talk at the same time.
I hope you enjoyed the article and that it proves useful to you, even if only a small part of it.
You might be interested in: How to add share buttons in Ghost CMS

Technical SEO consultant in Valencia for more than 16 years. Speaker and organiser at WordCamp Valencia and author on the Semrush and Publisuites blogs. More about me