
 Eric Jorge Seguí Parejo
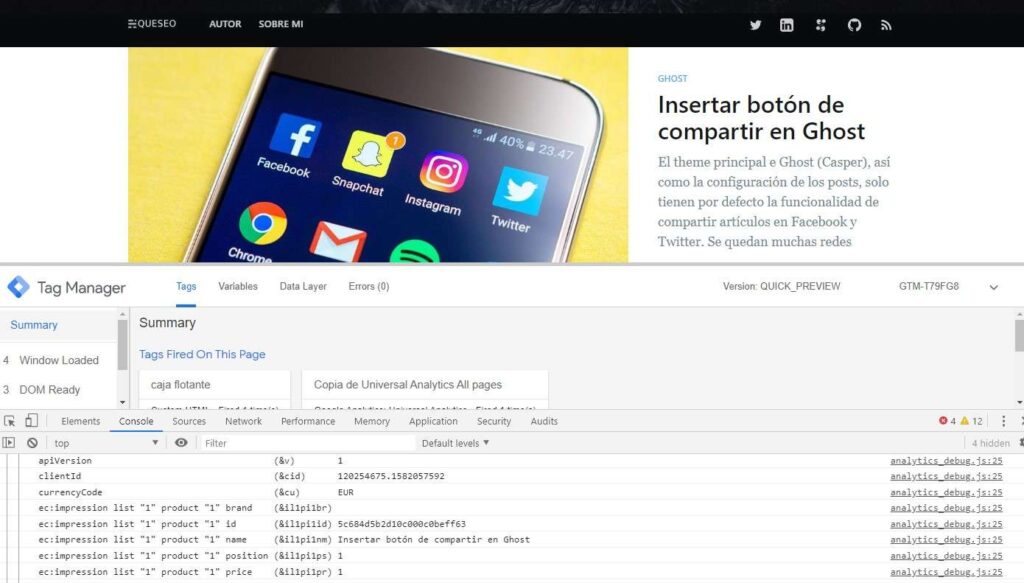
I’ve spent a few days researching and running different tests with the aim of tracking clicks, impressions and CTR with Google Analytics on the Ghost platform.
The idea is to start from Enhanced Ecommerce and feed it the information it needs, replacing the products for sale with news articles, the product brands with the author and the variants with the value of the tags.
I also ran the experiment on WordPress, and I’ll link to that article from this one shortly.
Current problems with the code
Some problems I have with this CMS that I haven’t solved yet are:
- I haven’t managed to get the pagination to keep the real position number, that is, if page one has nine articles, the second page should start at the tenth position. I think that if I can extract the pagination through a variable, I could do a small calculation to fix this.
- I also haven’t managed to pass the list variable where the article is printed. This happens because it sits in the post-card.hbs file, and when I write the {{title}} variable it gives me the post’s one rather than the page’s.
How to add Enhanced Ecommerce to Ghost articles
Here we’ll only use impressions, clicks and CTR, although we can make it much more complex and use other elements, for example treating dwell time as adding a product to the basket and subscribing to the newsletter as a transaction.
I placed the script for tracking impressions, and the function we need to call when a click happens, in defaul.hbs, and this is it:
Ghost 2.0 and 3.0
<!-- SCRIPT COMERCIO AVANZADO PARA POSTS-->

<script>
dataLayer.push({
'ecommerce':
	{
		'currencyCode': 'EUR',
		'impressions':
			[
			{{#foreach posts}}
			{
				'name': '{{title}}', // Nombre del post
				'id': '{{id}}', //  ID del post
				'price': '1',
				'brand': '{{author}}', // ID del Autor del artículo (recordad que en analytics no se deben guardar nombres ni emails)
				//'category': '{{primary_tag}}', // Primera categoría a la que pertenece el artículo
				//'variant': '{{tags}}', // etiquetas
				'list': '{{page}}', // Título de la página donde se mostró el post
				'position': 1,
			},

		{{/foreach}}
			]
	}
});
</script>
<script>

function productObject(titulo, id, marca, categoria, /*lista,*/ enlace) { //Función para trackear el click donde se recogen las variables para hacer seguimiento - Se debe llamar a la función y pasar las variables al pulsar sobre los artículos

dataLayer.push({
'event': 'productClick',
'ecommerce': {
'click': {
'actionField': {'list': 'Post clicado'}, // Optional list property.
'products': [{
'name': titulo, // Name or ID is required.
'id': id,
'price': '1',
'brand': marca,
'category': categoria,
'variant': 'variante'
}]
}
},
'eventCallback': function() {
document.location (enlace)
}
});
}
</script>
<!-- SCRIPT COMERCIO AVANZADO PARA POSTS-->
Inside /partials/post-card.hbs, on the links that take you to the articles, I added the following onclick event:
onclick="productObject('{{title}}','{{id}}','{{authors autolink="false"}}','{{tags autolink="false"}}','{{url}}')"Collecting the data with Tag Manager
As you can see, the data is being sent with a dataLayer.push. You need to collect this impression and click data using the basic Google Tag Manager setup for Enhanced Ecommerce.
The setup would be to create a tag with the following information for impressions:
- Tag type: Universal Analytics
- Track type: page view
- Enable Enhanced Ecommerce features: true
- Use data layer: true
- Trigger: event equals gtm.dom
And another one with the following information to collect clicks:
- Tag type: Universal Analytics
- Track type: event
- Event category: Ecommerce
- Event action: Product Click
- Enable Enhanced Ecommerce features: true
- Use data layer: true
- Trigger: event equals productClick
Finally, don’t forget to switch on the Enhanced Ecommerce option in Google Analytics.
Installation on other platforms
If you’ve landed on this article looking for information on how to install Enhanced Ecommerce on other platforms, I recommend you take a look at the article I wrote on the blog of the company I work for, where I explain installations for WordPress, PrestaShop and also how to do it with code alone.
If you have any questions or would like to contribute to the code, you can contact me through social media such as Twitter or LinkedIn, where I’m usually most active. You’ll find the links at the top of the blog.

Technical SEO consultant in Valencia for more than 16 years. Speaker and organiser at WordCamp Valencia and author on the Semrush and Publisuites blogs. More about me