 Eric Jorge Seguí Parejo

Version 3.9.0 of the Ghost CMS doesn’t include an article search option, or comments, and so on. However, you can integrate them with some very handy external apps that look perfectly fine and work almost flawlessly.
I dislike having to call external files, and that such basic features for a blog aren’t built in, as adding them can turn into a real headache.
That’s why I’ve decided to write this article explaining how to add a search box for those who can’t access the CMS core because their site is hosted on ghost.org.
Before you start
To do this you’ll need to tweak your current theme and create an account at https://www.sitesearch360.com/. It’s free, although if your website gets a lot of visits and searches you’ll have to pay to use the tool.
To work with your Ghost theme, you’ll need to download it from Settings -> Design, and at the bottom you’ll find your active theme. Download it by clicking Download.
Creating your SiteSearch360 account
When you create your SiteSearch360 account, just follow the steps. They’re quite straightforward and you can set the page to display in Spanish.
In the second-to-last step, it will give us the code that displays the form. We need to copy it and paste it into our downloaded theme. Where you paste it depends on where you want to display the search box, because that’s exactly what this code does: it displays it.

In my case I pasted it into the default.hbs file, right in the footer.
After saving these changes, you need to add the script from the last step.

In my case the tool detected that I had Google Tag Manager, so I implemented it with that tool, although it can just as easily be added to the website’s code.
One important point is that this last script changes if you edit the design with the visual configurator.
Visual configurator
SiteSearch360 also includes a feature for editing styles. You may need to configure some options from your CSS, but it will still save you quite a lot of work, and you can also change how the search results are displayed.
To access it, go to Installation under Visual Configuration.

The new window you reach gives you plenty of options to configure. From here you can change colours, margins, font sizes, borders and even some more advanced options such as tracking with Google Analytics, Tag Manager or enabling Voice Search.
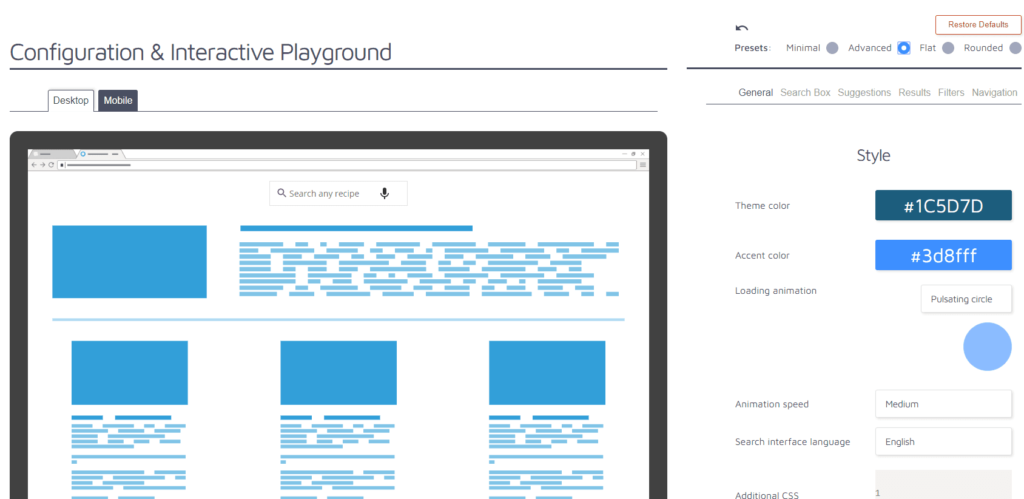
While you edit the search box, a preview is generated on the left of the screen, and you can switch between mobile and desktop view to see how it looks in both cases.
Once you’ve finished editing, at the bottom you’ll find the resulting script , which you need to swap for the one from the previous step that I mentioned before getting to this section of the article.
Uploading the design and testing
Once you’ve applied all these changes, save everything.
To upload the theme with your changes, go back to where you downloaded the active theme in your Ghost platform, and right at the bottom you’ll see a button that says Upload a Theme.
Upload your theme compressed as a zip there. As it’s the same theme you downloaded, you’ll get a warning about overwriting the theme. Accept and save the changes.
Now it’s time to go to your website, find the form and run a few tests to check that everything works properly.
Some issues with the design or fonts may crop up, so you might need to edit your CSS file.
I recommend being patient and careful with the cache, as it can play tricks on you when you make a change and the website shows you a cached version.
Understanding some extra features
Next I’m going to explain two features that I find very useful and even necessary these days. One is the option to track searches with Google Analytics and the other is the ability to do voice searches.
How to track with Google Analytics using SiteSearch360
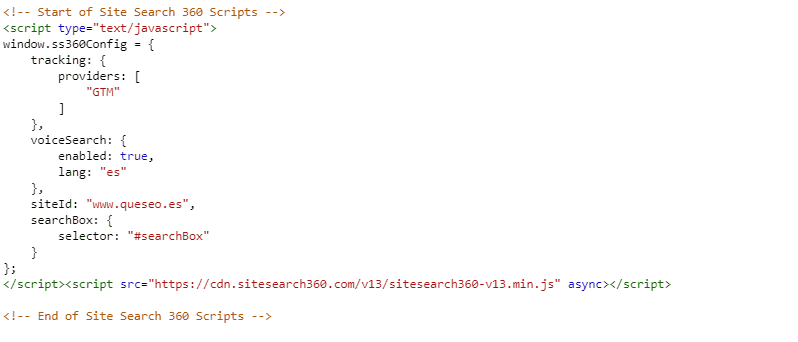
As you’ve just seen in the previous image, to track what people search for in your analytics tool, you just need to add the following code:
    tracking: {
        providers: [
            "GTM"
        ]
    },
The GTM value refers to Google Tag Manager tracking. It can be changed to GA if you want to send the information straight to Google Analytics, but it doesn’t send the data correctly, so I recommend using Tag Manager.
What the code does is add the search parameter ss360Query to the URL, so you can filter the results, and it ends up looking like this:
https://www.queseo.es/?ss360Query=google%20analytcsBy adding the ss360Query option as a search parameter in your Google Analytics view , tracking will be ready.
With Google Tag Manager you need to create a trigger with the custom event VirtualPageview to track the URL, together with a Google Analytics tracking tag .
How to add voice search to the search box
In this case the code you need is as follows:
    voiceSearch: {
        enabled: true,
        lang: "es"
    },
With this option we’ll have voice search enabled on your Ghost blog.
Conclusions
Adding a search box to Ghost is quite easy even though it doesn’t come as standard, but this is probably one reason, among others, why many people haven’t quite taken the plunge with this new CMS.
The feature for editing the design and functionality, and the option to run voice searches, are simply brilliant.
On the downside, it allows very few searches, and if you get a lot of visits, your website will need to pay so that users can keep using the tool.
If you found this article useful, you can support me by sharing it 👍🏻

Technical SEO consultant in Valencia for more than 16 years. Speaker and organiser at WordCamp Valencia and author on the Semrush and Publisuites blogs. More about me